4.1. Getting Started
In this section we will walk you through the basics of using RP. After you
have worked through this chapter, you will understand how to launch a local
ComputePilot and use a UnitManager to schedule and run ComputeUnits
(tasks) on it.
Note
The reader is assumed to be familiar with the general RP concepts as described in RADICAL-Pilot - Overview for reference.
Note
This chapter assumes that you have successfully installed RADICAL-Pilot, and also configured access to the resources you intent to use for the examples (see chapter Installation).
Note
We colloquially refer to ComputePilot as pilot, and to
ComputeUnit as unit.
You can download the basic 00_getting_started.py. The text below will explain the
most important code sections, and at the end shows the expected output
from the execution of the example. Please look carefully at the code comments as
they explain some aspects of the code which are not explicitly covered in the
text below.
4.1.1. Loading the RP Module, Follow the Application Execution
In order to use RADICAL-Pilot, you need to import the radical.pilot module (we use the rp abbreviation for the module name)
in your Python script or application:
import radical.pilot as rp
All example scripts used in this user guide use the LogReporter
facility (of RADICAL-Utils) to print runtime and progress information. You can
control that output with the RADICAL_PILOT_VERBOSE variable, which can be set
to the normal Python logging levels, and to the value REPORT to obtain well
formatted output. We assume the REPORT setting to be used when referencing
any output in this chapter.
os.environ['RADICAL_PILOT_VERBOSE'] = 'REPORT'

import radical.pilot as rp
import radical.utils as ru

report = ru.LogReporter(name='radical.pilot')
report.title('Getting Started (RP version %s)' % rp.version)
4.1.2. Creating a Session
A radical.pilot.Session is the root object for all other objects in
RADICAL- Pilot. radical.pilot.PilotManager and
radical.pilot.UnitManager instances are always attached to a Session,
and their lifetime is controlled by the session.
A Session also encapsulates the connection(s) to a backend MongoDB server which facilitates the communication between the RP application and the remote pilot jobs. More information about how RADICAL-Pilot uses MongoDB can be found in the RADICAL-Pilot - Overview section.
To create a new Session, the only thing you need to provide is the URL of
a MongoDB server. If no MongoDB URL is specified on session creation, RP
attempts to use the value specified via the RADICAL_PILOT_DBURL environment
variable.
os.environ['RADICAL_PILOT_DBURL'] = 'mongodb://db.host.net:27017/<db_name>'

session = rp.Session()
Warning
Always call radical.pilot.Session.close() before your
application terminates. This will terminate all lingering pilots and cleans
out the database entries of the session.
4.1.3. Creating ComputePilots
A radical.pilot.ComputePilot is responsible for ComputeUnit execution.
Pilots can be launched either locally or remotely, and
they can manage a single node or a large number of nodes on a cluster.
Pilots are created via a radical.pilot.PilotManager, by passing
a radical.pilot.ComputePilotDescription. The most important elements
of the ComputePilotDescription are
- resource: a label which specifies the target resource to run the pilot on, ie. the location of the pilot;
- cores : the number of CPU cores the pilot is expected to manage, ie. the size of the pilot;
- runtime : the numbers of minutes the pilot is expected to be active, ie. the runtime of the pilot.
Depending on the specific target resource and use case, other properties need to be specified. In our user guide examples, we use a separate config.json file to store a number of properties per resource label, to simplify the example code. The examples themselves then accept one or more resource labels, and create the pilots on those resources:
# use the resource specified as argument, fall back to localhost
try   : resource = sys.argv[1]
except: resource = 'local.localhost'

# create a pilot manage in the session
pmgr = rp.PilotManager(session=session)

# define an [n]-core local pilot that runs for [x] minutes
pdesc = rp.ComputePilotDescription({
        'resource'      : resource,
        'cores'         : 64,  # pilot size
        'runtime'       : 10,  # pilot runtime (min)
        'project'       : config[resource]['project'],
        'queue'         : config[resource]['queue'],
        'access_schema' : config[resource]['schema']
        }

# submit the pilot for launching
pilot = pmgr.submit_pilots(pdesc)
For a list of available resource labels, see List of Pre-Configured Resources (not all
of those resources are configured for the userguide examples). For further
details on the pilot description, please check the API Documentation.
Warning
Note that the submitted pilot agent will not terminate
when your Python scripts finishes. Pilot agents terminate only after
they have reached their runtime limit, are killed by the target system,
or if you explicitly cancel them via radical.pilot.Pilot.cancel(),
radical.pilot.PilotManager.cancel_pilots(), or
radical.pilot.Session.close(terminate=True)().
4.1.4. Submitting ComputeUnits
After you have launched a pilot, you can now generate
radical.pilot.ComputeUnit objects for the pilot to execute. You
can think of a ComputeUnit as something very similar to an operating system
process that consists of an executable, a list of arguments, and an
environment along with some runtime requirements.
Analogous to pilots, a units is described via a
radical.pilot.ComputeUnitDescription object. The mandatory properties
that you need to define are:
executable- the executable to launchcores- the number of cores required by the executable
Our basic example creates 128 units which each run /bin/date:
n    = 128   # number of units to run
cuds = list()
for i in range(0, n):
    # create a new CU description, and fill it.
    cud = rp.ComputeUnitDescription()
    cud.executable = '/bin/date'
    cuds.append(cud)
Units are executed by pilots. The :class:radical.pilot.UnitManager
class is responsible for routing those units from the application to the
available pilots. The UnitManager accepts ComputeUnitDescriptions as we
created above and assigns them, according to some scheduling algorithm, to the
set of available pilots for execution (pilots are made available to a
UnitManager via the add_pilot call):
# create a unit manager, submit units, and wait for their completion
umgr = rp.UnitManager(session=session)
umgr.add_pilots(pilot)
umgr.submit_units(cuds)
umgr.wait_units()
4.1.5. Running the Example
Note
Remember to set RADICAL_PILOT_DBURL in you environment (see chapter Installation).
Running the example will result in an output similar to the one shown below:
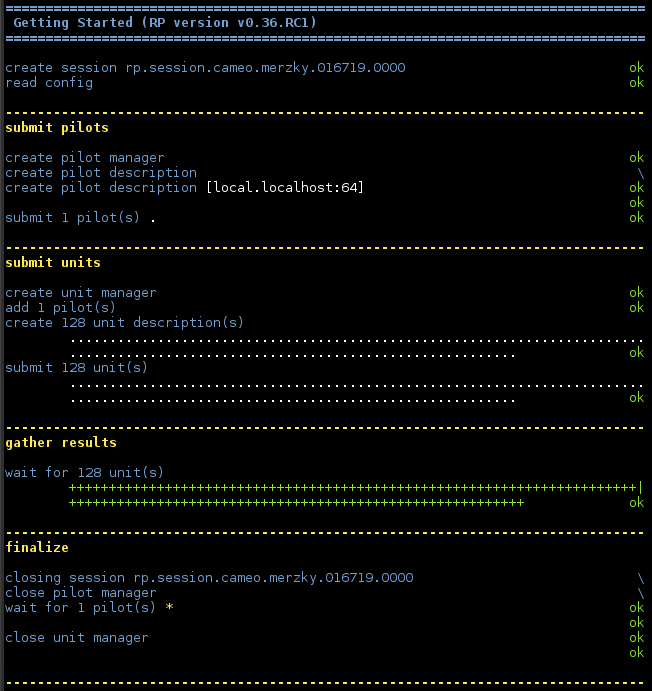
The runtime can vary significantly, and typically the first run on any resource will be longest. This is because the first time RP is used on a new resource for a specific user, it will set up a Python virtualenv for the pilot to use. Subsequent runs may update that virtualenv, or may install additional components as needed, but that should take less time than its creation. So please allow for a couple of minutes on the first execution (depending on your network connectivity, the connectivity of the target resource, and the location of the MongoDB service).
4.1.6. What’s Next?
The next user guide section (Obtaining Unit Details) will describe how an application can inspect completed units for more detailed information, such as exit codes and stdout/stderr.